This post is a quick review of a method to add a MicroBlaze .elf file to a bitfile and program the Flash so your Arty can operate standalone.
All code is available on GitHub. Digilent programming guide info is here.
An overview of the test subsystem is shown below. We have three main IO blocks alongside the microblaze and other blocks required for a working system.
- UART : Print “Hello World” to console, shows code functioning
- GPIO to basic LED’s: default set to OxF in design so we can tell bitstream is programmed, even if firmware is not running.
- GPIO to RGB LED: flash all led’s each “Hello World” print, visual indicator that the firmware is running from the bitstream saved to FLASH

- Firstly create an Arty project, source the .tcl file and build the design.
- Once built “Export Hardware” and start SDK.
- In SDK create a basic project and swap in the C code from Github.
- Load and run to check function, you should see the RGB LED’s flashing on and off, with the 4 single LED’s lit.
Now we have an .elf we want to associate with the MicroBlaze so it gets added to the bit file.
- Open the design in IPI
- Navigate to the MicroBlaze IP and right click when selected
- Choose “associate ELF files” and under “Design Sources” point to the file in your SDK area.

- Under “Bitstream Settings” in “Program and Debug” choose to also generate a .bin file.
- Next regenerate the Bitstream
You should see a message similar to this in the log indicating the MicroBlaze BRAM was populated with the firmware.
INFO: [Memdata 28-144] Successfully populated the BRAM INIT strings from the following elf files: C:/Users/a/arty/000-testSpi/000-testSpi.sdk/aaa/Debug/aaa.elf
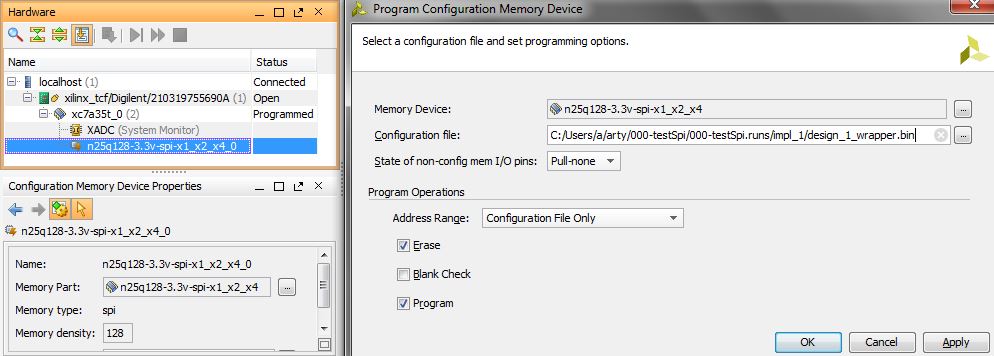
Next we need to program the Flash.
- “Open Target” under hardware manager
- Right click on the Arty device “xc7a35t_0” and select “Add Configuration Memoey Device”
- The correct part is the n25q128-3.3v-spi-x1_x2_x4
- Next choose to program the device and select the .bin file we have just created
- Click ok to program, this will take a few minutes
And we are done.
- Unplug the Arty
- Plug Arty in again.
- Press reset, after about 4 seconds the LED’s should light up and start flashing.

I have attempted to use this method with some code that I wrote. Unfortunately, I can’t seem to get my program to run. I can see that the bit stream is programmed (I have configured the hardware to illuminate an LED as noted in step 2). On power up, I see the LED’s configured in step 2 light up but not the status one i set in my code to illuminate once the application is running. Any help on this would be greatly appreciated !
LikeLike
Does your code run if you program the FPGA and not the flash?
Have you reviewed the log for the Memdata 28-144 message?
LikeLike